Monday, on break at work I walked to the Grand Rapids Library and checked out craft books. I love our downtown library. They have so many interesting things and the building itself is beautiful. (Someday I'll take you on a photo tour!) For now, you can see it HERE. The main building is still exactly the same on the inside with additions built off the back.
I found some books there that had tons of great ideas. This idea came from the Dorm Decor book. Which tells me a) I'm reverting back to my college years (b/c I always wanted to live in the dorm, but my parents wouldn't let me) or b) I love decorating small spaces. I'll go with B. It makes me seem more mature. (Those who know me are laughing right now...there is nothing mature about me)
Notice I haven't told you what we're making yet. Its because its a surprise and AMAZINGLY CUTE and I want to torture you through the tutorial. Trust me. You're going to LOVE it.
The supply list: Say it with me...Chicken Wire (YAY!), birds, spray paint, ribbon, hot glue gun and a wire cutter.
Cut a length of chicken wire to 22". Then determine how long you would like the project. The book suggested 12". I went with 16". I like to make a statement.
Hook the two ends together to form a cylinder (had to ask how to spell that one!)
Then spray paint. I chose white. But would be super cute in a bright color as well!
Take your ribbon and cut two pieces the same length, long enough to hook it to the ceiling or where ever you might hang it.
Hot glue the ribbon closed around the top of the chicken wire, then do the same with the other end directly across from the first. Do the same with the second piece so that the two pieces form an X.
At the top, tie a knot with a short piece of ribbon to keep the two long pieces together. (I feel like I'm being overly descriptive. I hope this makes sense!)
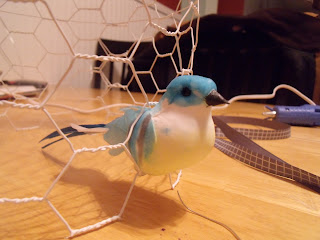
Next attach your birds randomly. The birds I purchased (from the dollar store) came with wire to attach them with. I also put a little dot of hot glue on the birds to keep them steady after attaching them to the chicken wire. (Yup, still fun to say!)
Next, figure out where your going to hang it and pre-drill your hold for the hook.
Screw your hook in. (I painted mine. I only had yucky brass colored ones. Gross.)
Next hang it up! Do you see what it is?! It looks super cute on its own, but wait!
Let's deviate again. (Yup...deviate. Another great word.) This is why I made it! Look at the current state of my jewelry box. Not to mention that I could walk into any given room and find a pair (or three) of earrings that I randomly took off and didn't want to put in my jewelry box for fear of losing them. You know its bad when you feel more confident in finding a matching pair of earrings in a room where anything from a kid, cat or dog could take them rather than putting them in a box MEANT for the pair!
It took me longer to untangle, match jewelry and put it on the display than it did to make the thing, but I LOVE the way it turned out. I also love how it added so much charm to the bathroom. The hubby even loves it!
Not only is it super easy to find my matching sets and see all my jewelry at the same time, I can also display pieces with sentimental value, like my great-grandma's set below.
Or my collection of brooches.
I love how it adds such a whimsical feel to the bathroom!
There are numerous modifications you can make to adapt this for other rooms. Need to hang it on and existing pole? Use Velcro instead of hot glue to attach the ribbon. Don't have a place to hang it? Its sturdy enough to sit on a dresser. You just lose the space on the bottom to let jewelry hang off! My sister-in-laws love it so much, they are coming over next week to make their very own!
I'll show you after the New Year what I'm doing with my rings and bracelets!


I have a love for chicken wire too...There are so many great things you can do with it. Yours is a great idea to add to the list! Love the colorful birds...
ReplyDeleteTake care,
Lisa
This is great. I have something similar, but I will have to try this. Thanks.
ReplyDeleteI saw this in person this morning and it is even cuter in real life! Nice job Sarah!!
ReplyDeleteThis is SO cool! You should definitely link up over at my Favorite 2010 Project Party here
ReplyDeletehttp://charmbraceletdiva.blogspot.com/2010/12/link-up-your-favorite-2010-project.html
Have a happy holiday!
GREAT idea!!! Thanks for linking up and sharing on Thrilling Thursday @ Paisley Passions. Hope you stop by again soon.
ReplyDeletethat is sooo cute! i love it! can u attach earrings that aren't french hook or the kind that clasps together? u know, the ones w/ separate backs? thanks!
ReplyDeleteThanks for your comments! To answer the last question: mine isn't set up to have small earrings attached (see what I do with mine in the next post), but you could easily attach a section of screen to it on the backside to hold your smaller earrings!
ReplyDeletejust saw this on the linky party at not just a housewife and love it! i'm such a sucker for all things bird...including chicken wire. :) great job!!
ReplyDelete